A complete guide to Solana development for Ethereum developers
In this article, we’ll dive into the key differences between developing on Ethereum and Solana, and guide you on how to build on Solana. For developers coming from Ethereum, Solana will look and feel very different, with a diverse toolset to work with. This article will provide you with all the tools you need to build on Solana for your needs building on Solana in the context of Ethereum.
How is Solana different from Ethereum?
Account model
The most significant difference you will encounter when developing on Solana is the account model design. It's helpful to understand why Solana's account model is designed differently. Unlike Ethereum, Solana is designed to take advantage of multiple cores in high-end machines. There is a trend in computing resources where over time the number of cores available increases and becomes cheaper for people to purchase. With this in mind, the account model was designed to leverage multiple cores, creating a system that can parallelize transactions against each other. This parallelization creates further optimizations such as local fee markets and faster throughput, which we will explore later.
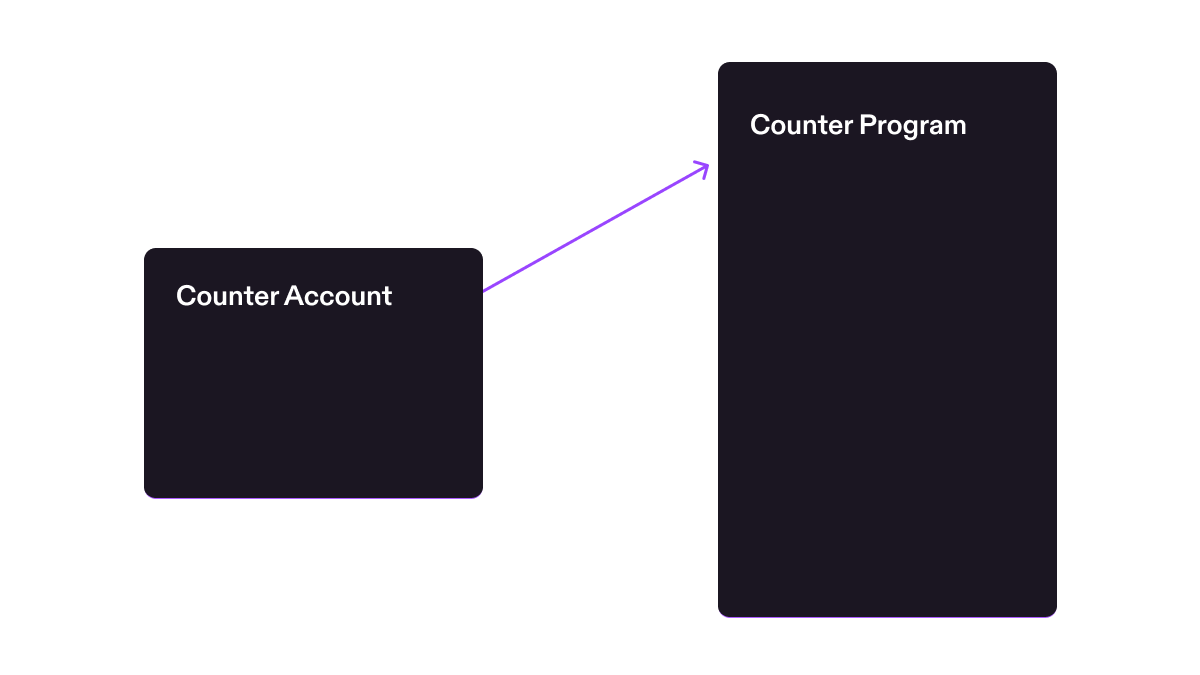
So what does “account model” mean? On Solana, an account is like an object that contains some arbitrary data and specific modification rules. On Solana, everything is an account, including smart contracts. Unlike Ethereum, where each smart contract is an account that contains execution logic and storage tied together, Solana's smart contracts are completely stateless.
Smart contracts on Solana do not carry their own state, state must be passed to them in order to execute. To illustrate this, let’s look at a Solidity smart contract on Ethereum and two counter smart contracts using Rust on Solana.
Ethereum counter smart contract
contract Counter {
  int private count = 0;

  function incrementCounter() public
  { count += 1;
  }

  function getCount() public constant returns (int) {
    return count;
  }
}
Solana counter program
#[program]
pub mod counter_anchor {
use super::*;


pub fn initialize_counter(_ctx: Context<InitializeCounter>) -> Result<()> {
  Ok(())
}

pub fn increment(ctx: Context<Increment>) -> Result<()> {

ctx.accounts.counter.count =   ctx.accounts.counter.count.checked_add(1).unwrap();
  Ok(())
 }
}

#[derive(Accounts)]
pub struct InitializeCounter<'info> {
#[account(mut)]
pub payer: Signer<'info>,
#[account(
init,
space = 8 + Counter::INIT_SPACE,
payer = payer
)]

pub counter: Account<'info, Counter>,
pub system_program: Program<'info, System>,
}

#[derive(Accounts)]
pub struct Increment<'info> {
  #[account(mut)]
  pub counter: Account<'info, Counter>,
}

#[account]
#[derive(InitSpace)]
pub struct Counter {
  count: u64,
}
There are separate accounts to store data external to the program. To execute the logic in your program, you need to pass the account on which the action is to be performed. In the case of this counter program, when calling the increment function, you will pass a counter account to the program and the program will increment counter The value in the account.
What are the benefits of the Solana account model?
One of the most important benefits of the Solana account model is program reusability.
Take ERC20 as an example. ERC20 defines an interface specification for tokens on Ethereum. Whenever someone wants to create a new token, the developer must redeploy the ERC20 smart contract with the specified value onto Ethereum, incurring high redeployment costs.
Solana is different. When creating a new token, you don't need to redeploy another smart contract on the blockchain. Instead, you can create a new account, called a minting account, based on the Solana Token Program, where the account defines a set of values including the number of tokens in circulation, decimal points, who can mint more tokens, and who can freeze tokens. currency.
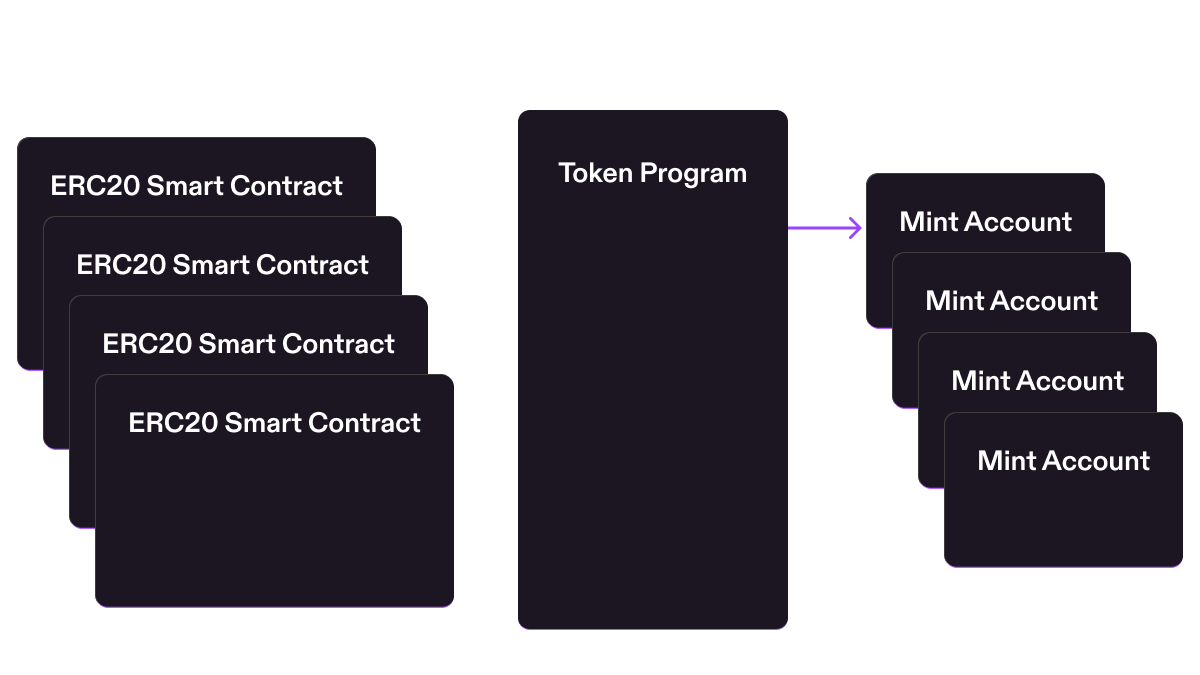
On Solana, you don’t need to write any Rust or smart contracts to deploy new tokens. Simply send a transaction to the Token Program to create a new token in the language of your choice, and the token will appear in your wallet. Using the Solana Program Library CLI, you can do this with a single command:
$ spl-token create-tokenlocal fee market
Another lucky side effect of having a Solana account model is the ability to model fees based on state contention. As mentioned before, transactions can be executed in parallel. However, they are executed in parallel only based on the account being written to. For example, let’s say there’s a popular NFT minting activity going on on Solana. Normally, this kind of heat would increase the price for everyone using the chain, but in this case, everyone not involved in the minting of the NFT is unaffected.
As the name suggests, fee markets are fees local to each account. If you’re sending a USDC transfer while everyone else is minting the hottest new NFT, you won’t be affected and continue to pay the low fees you’re accustomed to on Solana. This works for any application in Solana, avoiding the common global fee market you’re used to on Ethereum while lowering costs for everyone.
How do fees work on Solana?
Fees on Solana are divided into several categories: base fees, priority fees, and rental fees.
The base fee can be calculated based on the number of signatures in the transaction. Each signature costs 5000 lamports (0.000000001 sol = 1 lamport). If your transaction requires 5 signatures, the base fee will be 25,000 lamports. This base fee adds financial pressure to the cluster's signature verification, which is one of the more computationally intensive activities. Half of the base fee is burned and the other half is awarded to validators.
A priority fee is an optional fee that anyone can add to a transaction to give it priority over other transactions executing at the same time. Priority fees are measured based on the number of compute units used in the transaction. Compute units are similar to Gas on Ethereum and are a simple measure of the computational resources required for a transaction. Like the base fee, half of the priority fee is burned and the other half is awarded to validators.
The final fee, rent, is more like a deposit than a fee. When you create an account or allocate space on a network, you must deposit some SOL to the network to maintain your account. Rent is calculated based on the number of bytes stored on the network, with an additional base fee charged for allocating space. It is important to note that rental charges are not lost; they can be recovered if you close the account and allow the cluster to reclaim the allocated space.
How do transactions work on Solana?
When it comes to paying every fee when executing a trade, it's important to understand how the trade works. A transaction consists of four parts:
- one or more instructions
- an array of accounts to read or write
- one or more signatures
- A instruction of the most recent block hash or nonce is the smallest execution logic on Solana. Directives are calls that update global Solana state. Instructions call a program that calls the Solana runtime to update status (for example, call a token program to transfer tokens from your account to another account). You can think of instructions as function calls on an Ethereum smart contract.
An important difference between Ethereum and Solana is the number of function calls in a single transaction, which depends on the number of instructions. Having multiple instructions in each transaction benefits developers because they do not have to create custom smart contracts to link functions in a single transaction. Each instruction can be a separate function call, executed sequentially within the transaction. Transactions are atomic, meaning if any instruction within them fails, the entire transaction fails and you only pay the transaction fee. This is like a transaction failing due to not setting the correct slippage on Ethereum.
Another key difference to remember is using the most recent blockhash instead of the incremental nonce in transactions. When a wallet wants to make a transaction, the most recent blockhash is pulled from the cluster to create a valid transaction. This most recent blockhash only makes the transaction valid for 150 blocks after the most recent blockhash was extracted. This prevents long-lived transaction signatures from being executed at a later time.
What are the restrictions on transactions on Solana?
Similar to Ethereum’s gas limit, Solana’s transactions also have specific computational unit limits. Each limit is as follows:
| Solana | ||
|---|---|---|
| 30,000,000 | 1,400,000 | |
| 30,000,000 Gas | 48,000,000 |
Solana also imposes other restrictions on transactions. Each referenced account can use up to 12,000,000 compute units per block. This limit prevents one account from locking too many writes in a single block, further preventing the local fee market from being dominated by one account.
Another limitation of trading is the depth of order calls you can make in a single order. This limit is currently set to 4, which means you can only call instructions at a depth of 4 before the trade will be rolled back. This makes re-entrancy issues non-existent on Solana, compared to what you have to worry about on Ethereum.
Where is the memory pool?
Unlike Ethereum, there is no mempool on Solana. Solana validators forward transactions to up to four scheduled leaders. While Solana does not have a mempool, it still has priority fees to help order transactions. Not having a mempool causes transactions to jump from leader to leader until the block hash expires, but it reduces the overhead of passing mempools across the cluster.
Where can I find smart contract code?
In the EVM world, most people will find the smart contract code on Etherscan when they look at the smart contract address. However, viewing smart contract code through a browser is relatively new in the Solana ecosystem and needs to be established compared to the EVM standard. At the time of writing, Solana.fm is the only browser that supports viewing smart contract code based on Verifiable Builds.
You can find the smart contract code by accessing the browser of the smart contract address. For example, visiting Pheonix Smart Contract, you can find the code of the smart contract under the Verification tab. From here, you can analyze the code and understand whether the smart contract is what you want to interact with.
How are development environments different?
programming language
EVM mainly uses Solidity to write smart contracts, while Solana uses Rust. There's a framework called Anchor Framework that allows you to build in Rust and use a lot of the tools you're familiar with from the EVM, but still in Rust. If you want to continue building with Solidity on Solana, a project called Neon enables you to use Solidity. Neon comes with many tools you are familiar with, such as Foundry or Hardhat for use during development. Using Neon may get you started building Solana faster, but you'll need more combinations with other Solana projects outside of the Neon ecosystem.
Similar to Ethereum, on the client side you can find comparable SDKs for various programming languages on Solana.
| SDK | |
|---|---|
| Javascript | solana/web3.js |
| Rust | solana_sdk |
| Python | solana-py |
| Java | solanaj |
| C++ | solcpp |
| C# | Solnet |
| GoLang | solana-go |
Where are the EVM tools I'm familiar with?
As you move from EVM to Solana builds, you may be looking for tools that are familiar to you. Currently, there is no tool equivalent to Foundry in the Solana ecosystem, but there are a fair number of other tools that are equivalent to what you are used to.
| 工具 | Solana 等效工具 |
|---|---|
| HardHat | Solana 测试验证器 |
| Brownie | Program-test, BankRun.js |
| Ethers, Wagmi | @solana/web.js |
| Remix | Solana Playground |
| ABI | Anchor 框架的 IDL |
| Etherscan | SolanaFM, XRay |
| scaffold-eth | create-solana-dapp |
How is smart contract development different?
There are a few things to note when building a program for Solana or migrating your Ethereum smart contracts.
For example, if you want a mapping like that used on Ethereum smart contracts, this type does not exist on Solana. Instead, you can use a program-derived address (PDA for short). Similar to mappings, procedurally derived addresses allow you to create a mapping from a key or account to a value stored on-chain. The way you do mapping is different from Ethereum.
Let's say you want to map user accounts to on-chain balances. In Solidity, you would do the following:
mapping(address => uint) public balances;To use program-derived addresses, you need to do the following:
Client:
const [BALANCE_PDA] = await anchor.web3.PublicKey.findProgramAddress(
  [Buffer.from("BALANCE"), pg.wallet.publicKey.toBuffer()],
  pg.program.programId
);
program:
#[derive(Accounts)]
#[instruction(restaurant: String)]

pub struct BalanceAccounts<'info> {

#[account(
  init_if_needed,
  payer = signer,
  space = 500,
  seeds = [balance.as_bytes().as_ref(), signer.key().as_ref()],
  bump
  )]

pub balance: Account<'info,BalanceAccount>,

#[account(mut)]
pub signer: Signer<'info>,
pub system_program: Program<'info, System>,
}

#[account]
pub struct BalanceAccount {
  pub balance: u8
}
The map's key is a combination of the "balance" string and the signer's public key, and the program-derived address provides the location to look up the mapped value. Program-derived addresses provide more than just mapping; we can learn more about that later.
In Solidity, the ability to upgrade smart contracts using proxy contracts has become the norm. On Solana, programs are upgradeable by default without any special work. Each smart contract can be upgraded through the CLI command solana program deploy <program_filepath>. Although a program is upgradeable by default, you can downgrade its status to immutable via solana program set-upgrade-authority <program_address> --final. Once immutable, the program will be marked as non-upgradeable in the browser.
When writing Solidity smart contracts, a common operation is to check msg.sender or tx.origin. There is no equivalent on Solana because each transaction can have multiple signers. Additionally, the person sending the transaction is not necessarily the person signing the transaction, since you can have someone else pay the transaction fees for you.
Let's look at a basic Solana program:
#[program]
pub mod gettingSigners {
  use super::*;

  pub fn initialize(ctx: Context<Initialize>) -> Result<()> {
    let the_signer: &mut Signer = &mut ctx.accounts.the_signer;
    msg!("The signer: {:?}", *the_signer.key);
   Ok(())
  }
}

#[derive(Accounts)]

pub struct Initialize<'info> {
  #[account(mut)]
  pub the_signer: Signer<'info>,
}
This will output the signer of the transaction in your program log. As mentioned before, you can have multiple signers:
#[program]

pub mod gettingSigners {
use super::*;

pub fn initialize(ctx: Context<Initialize>) -> Result<()> {
  let the_signer: &mut Signer = &mut ctx.accounts.first_signer;
  msg!("The signer: {:?}", *the_signer.key);
  Ok(())
  }
}


#[derive(Accounts)]
pub struct Initialize<'info> {
  #[account(mut)]
  pub first_signer: Signer<'info>,
  pub second_signer: Signer<'info>,
}
The example above shows that this particular program has multiple signers, first_signer and second_signer. We can't determine which one was the payer, but we know both signed off on the transaction. You can learn more about obtaining signers at Rareskills.
How do I build my EVM project on Solana?
Let’s take a simple project built in Solidity as an example to demonstrate how to build the same project on Solana. A common entry-level project you may encounter is a voting project. The Solidity smart contract looks like this:
pragma solidity ^0.6.4;

contract Voting {
mapping (bytes32 => uint256) public votesReceived;
bytes32[] public candidateList;

constructor(bytes32[] memory candidateNames) public {
  candidateList = candidateNames;
}

function voteForCandidate(bytes32 candidate) public {
  require(validCandidate(candidate));
  votesReceived[candidate] += 1;
}

function totalVotesFor(bytes32 candidate) view public returns (uint256) {
  require(validCandidate(candidate));
  return votesReceived[candidate];
}

function validCandidate(bytes32 candidate) view public returns (bool) {
  for(uint i = 0; i < candidateList.length; i++) {
    if (candidateList[i] == candidate) {
      return true;
  }
  }
  return false;
}
}
We quickly discovered some features that were not available in the Solana program. View functions and mapping need to be done differently. Let’s start building this project on Solana!
Let's create our very basic Solana program skeleton:
use anchor_lang::prelude::*;

declare_id!("6voY4gV7kzuGr4hE2xjZnkdagFGNhEe8WonZ8UtdPWig");

#[program]
pub mod voting {
use super::*;
pub fn init_candidate(ctx: Context<InitializeCandidate>) -> Result<()> {
Ok(())
}


pub fn vote_for_candidate(ctx: Context<VoteCandidate>) -> Result<()> {
Ok(())
}
}

#[derive(Accounts)]
pub struct InitializeCandidate{}

#[derive(Accounts)]
pub struct VoteCandidate{}
There are two functions in our voting program, init_candidate and vote_for_candidate. The init_candidate function maps directly to our constructor in the Solidity smart contract, while vote_for_candidate corresponds one-to-one to voteForCandidate in Solidity.
One problem with init_candidate today is that it can be called by anyone without permission, whereas in Solidity the constructor can only be called by the contract deployer. To solve this problem, we will adopt a functionality similar to onlyOwner in Solidity. We set a specific address in the Solana program and only that address can execute the instruction.
Assume our public key is 8os8PKYmeVjU1mmwHZZNTEv5hpBXi5VvEKGzykduZAik. By adding a reference to this public key in the Solana program and requiring the signer to match, we are effectively mocking the onlyOwner and constructor functions.
use anchor_lang::prelude::*;


declare_id!("6voY4gV7kzuGr4hE2xjZnkdagFGNhEe8WonZ8UtdPWig");

const OWNER: &str = "8os8PKYmeVjU1mmwHZZNTEv5hpBXi5VvEKGzykduZAik";

#[program]
pub mod voting {
use super::*;

#[access_control(check(&ctx))]
pub fn init_candidate(ctx: Context<InitializeCandidate>) -> Result<()> {
Ok(())
}

pub fn vote_for_candidate(ctx: Context<VoteCandidate>) -> Result<()> {
Ok(())
}
}

#[derive(Accounts)]
pub struct InitializeCandidate<'info> {

#[account(mut)]
pub payer: Signer<'info>,
}


#[derive(Accounts)]
pub struct VoteCandidate {}


fn check(ctx: &Context<InitializeCandidate>) -> Result<()> {

// Check if signer === owner
require_keys_eq!(
ctx.accounts.payer.key(),
OWNER.parse::<Pubkey>().unwrap(),
OnlyOwnerError::NotOwner
);

Ok(())
}

#[error_code]
pub enum OnlyOwnerError {

#[msg("Only owner can call this function!")]
NotOwner,

}
We added an access control function check that will check if the signer of init_candidate matches the address listed in the smart contract. If the signers do not match, OnlyOwnerError will be thrown and the transaction will fail.
Let’s continue discussing candidateList and votesReceived in Solidity smart contracts. While you can use Vec similar to bytes32[] in a Solana program, managing payments that change sizes can be a bit cumbersome. Instead, we will utilize a program-derived address given a specific candidate name, and the value of that address will be that candidate's votesReceived.
To use a program-derived account in a Solana program, you need to use seeds and bump in the account. First, let's create the account used to track votesReceived.
#[account]
#[derive(InitSpace)]

pub struct Candidate {
  pub votes_received: u8,

}
#[account] marks the structure as a Solana account, while #[derive(InitSpace)] is a useful macro for automatically calculating the Candidate allocated space. votes_received can save counts like votesReceived in Solidity smart contracts.
Extending InitializeCandidate and VoteCandidate we get the following:
#[derive(Accounts)]
#[instruction(_candidate_Name: String)]

pub struct InitializeCandidate<'info> {
    #[account(mut)]
    pub payer: Signer<'info>,

    #[account(
        init,
        space = 8 + Candidate::INIT_SPACE,
        payer = payer,
        seeds = [_candidate_Name.as_bytes().as_ref()],
        bump,
        )]
    pub candidate: Account<'info, Candidate>,
    pub system_program: Program<'info, System>,
}

#[derive(Accounts)]
#[instruction(_candidate_Name: String)]

pub struct VoteCandidate<'info> {
    #[account(
        mut,
        seeds = [_candidate_Name.as_bytes().as_ref()],
        bump,
        )]
    pub candidate: Account<'info, Candidate>,
}
Wow, there are a lot of new codes in the account. Let’s decipher it.
First, you'll notice #[instruction(_candidate_Name: String)]. This means that the context of InitializeCandidate expects a string _candidate_name to be passed into the directive. We'll see this used later in seeds = [_candidate_name.as_bytes().as_ref()]. This means that the seed of the PDA will be _candidate_Name and the value stored in the PDA will be the candidate's votes_received.
Next, you may have some questions about space = 8 + Candidate::INIT_SPACE. Candidate::INIT_SPACE is the size of the Candidate account + 8, 8 is the Anchor framework account added for security checking byte. pub system_program: Program<'info, System> is required when creating an account, which is represented by init. This means that whenever a directive using the InitializeCandidate context is called, the directive will attempt to create a candidate account.
Now let's add the business logic found in voteForCandidate in the Solidity smart contract.
pub fn vote_for_candidate(ctx: Context<VoteCandidate>, _candidate_name: String) -> Result<()> {
    ctx.accounts.candidate.votes_received += 1;
    Ok(())

    }
Here we take the extra parameter _candidate_name discussed earlier. This will help match the exact account we quoted to add one to the vote count for that candidate.
That’s all we need to do in the Solana terminal, the final Solana program looks like this:
use anchor_lang::prelude::*;

declare_id!("6voY4gV7kzuGr4hE2xjZnkdagFGNhEe8WonZ8UtdPWig");

const OWNER: &str = "8os8PKYmeVjU1mmwHZZNTEv5hpBXi5VvEKGzykduZAik";

#[program]

pub mod voting {

    use super::*;

    #[access_control(check(&ctx))]

    pub fn init_candidate(
        ctx: Context<InitializeCandidate>,
        _candidate_name: String,
    ) -> Result<()> {
        Ok(())
    }

    pub fn vote_for_candidate(ctx: Context<VoteCandidate>, _candidate_name: String) -> Result<()> {
        ctx.accounts.candidate.votes_received += 1;

        Ok(())
    }
}

#[derive(Accounts)]
#[instruction(_candidate_name: String)]

pub struct InitializeCandidate<'info> {
    #[account(mut)]
    pub payer: Signer<'info>,

    #[account(
        init,
        space = 8 + Candidate::INIT_SPACE,
        payer = payer,
        seeds = [_candidate_name.as_bytes().as_ref()],
        bump,
        )]
    pub candidate: Account<'info, Candidate>,

    pub system_program: Program<'info, System>,
}

#[derive(Accounts)]
#[instruction(_candidate_name: String)]

pub struct VoteCandidate<'info> {
    #[account(
        mut,
        seeds = [_candidate_name.as_bytes().as_ref()],
        bump,
        )]
    pub candidate: Account<'info, Candidate>,
}

#[account]
#[derive(InitSpace)]

pub struct Candidate {
    pub votes_received: u8,
}

fn check(ctx: &Context<InitializeCandidate>) -> Result<()> {
    // Check if signer === owner

    require_keys_eq!(
        ctx.accounts.payer.key(),
        OWNER.parse::<Pubkey>().unwrap(),
        OnlyOwnerError::NotOwner
    );

    Ok(())
}

#[error_code]

pub enum OnlyOwnerError {
    #[msg("Only owner can call this function!")]
    NotOwner,
}
Now you may be thinking, "Wait, what about totalVotesFor and validCandidate in Solidity smart contracts?" validCandidate is already taken into account, because if Passing an account that does not exist, vote_for_candidate will fail. totalVotesFor can be done on the client side using Typescript and does not need to exist in the Solana program.
Now that we have built our Solana program, let's interact with it.
Loading the program into Solana Playground I can build and deploy to Devnet. After you build and deploy your program, you'll find that you can run the tests by following the instructions on the Tests tab. This is similar to using Remix to test your Solidity smart contracts. Open initCandidate and enter the name John Smith as the candidate name, now we need to generate PDA for John Smith. Click on the Candidate Account Finder and select From seed. Select Custom String and enter John Smith, and finally click generate. Congratulations, you just found John Smith's PDA! Now click Test to execute the command.
If all goes well, you should see the following program log in the test transaction.
Let's vote for John Smith now! Open the voteForCandidate command, enter John Smith and generate the same PDA again. Click Test to vote for your first candidate!
After voting, how do you check how many votes a candidate received? Go to Candidate in Accounts under the Test tab and click the Fetch All button. This will get all valid candidates and their vote count. You will then receive an array of candidates, their account addresses, and the number of votes they received.
Congratulations! You just converted your voting Solidity smart contract into a Solana program. You can use many of the same techniques to build on other Solidity smart contracts what you have on the EVM on Solana. If you're interested in learning more about Solana, Check out the documentation and get started today.
本文由SlerfTools翻译,转载请注明出处。
SlerfTools是专为Solana设计的工具箱,致力于简化区块链操作,提供无编程全可视化界面,使发币、管理流动性和无代码创建Dapp等复杂过程变得安全简单。