Blinks 客户端简介
就在 2 周前,我们与 Solana 基金会合作推出了 Solana Actions 和区块链链接(闪烁)。从那时起,参与度呈爆炸式增长。数以百计的开发人员现在正在 Solana 上构建眨眼功能,十几个钱包现在正在将眨眼功能集成到他们的 Chrome 扩展程序和移动应用程序中。 然而,我们 blinks 的使命是展开互联网,使产品体验在任何地方都可以共享。 因此,今天,我们将对 Blinks 客户端 SDK 进行重大升级。现在,任何开发者都可以使用此 SDK 为他们的 Chrome 扩展程序、网站和其他应用带来闪烁,并自定义体验以完美契合他们的品牌。
就在 2 周前,我们与 Solana 基金会合作推出了 Solana Actions 和区块链链接(闪烁)。从那时起,参与度呈爆炸式增长。数以百计的开发人员现在正在 Solana 上构建眨眼功能,十几个钱包现在正在将眨眼功能集成到他们的 Chrome 扩展程序和移动应用程序中。
如今,眨眼功能可以通过支持的钱包 Chrome 扩展程序(例如 Phantom、Backpack 和 OKX)在 X 上使用,也可以在 dial.to 我们的插页式“弹出式”网站上使用。
然而,我们 blinks 的使命是展开互联网,使产品体验在任何地方都可以共享。
因此,今天,我们将对 Blinks 客户端 SDK 进行重大升级。现在,任何开发者都可以使用此 SDK 为他们的 Chrome 扩展程序、网站和其他应用带来闪烁,并自定义体验以完美契合他们的品牌。
凡是可以分享链接的地方,都应该能够分享眨眼。
此外,我们将为 X 以外的新网站添加开箱即用的支持,包括 Reddit、Twitch 等,此外还有钱包或其他寻求更多覆盖范围的扩展。
您可以在 https://github.com/dialectlabs/blinks 找到我们的 Blinks SDK。

想开始吗?这是一个分步教程
- 将 blinks 原生集成到您的 web3 dApp 中。
- 通过 Chrome 扩展程序添加对更多网站的支持,例如 Reddit、Twitch、LinkedIn 等。
我们的 Blinks SDK 支持开箱即用的这两种用例。如果您有兴趣为 OSS 做出贡献并为 Dialect 的 Blinks SDK 添加更多站点支持,请联系我们,我们很乐意与您联系。在我们的 Discord 中联系我们。
本文的其余部分假定你已构建并部署了自己的操作 API。如果您还没有,请查看我们的文档如何开始使用。
注意:本指南中的代码示例来自截至发布之日的 SDK。如果您发现样本已过时,请访问我们文档中的指南。
指南:将 Blinks 原生集成到您的 dapp 中
您现在可以使用 Dialect 的 Blinks SDK 将眨眼集成到您的 React 应用程序中:https://github.com/dialectlabs/blinks。
在此示例中,我们将使用 NextJS 和 TypeScript。如果您想对此有更全面的了解,请查看我们文档中的指南。
# npm
npm i @dialectlabs/blinks#yarn
#yarn
yarn add @dialectlabs/blinks
Once you’ve installed these packages in the root of your application, make sure you’ve also installed the required wallet adapter packages and components and wrapped the body of the webpage with the adapter components in layout.tsx. Then, either in page.tsx or in a new component, you can include the logic for rendering the Blink UI.在应用程序的根目录中安装这些包后,请确保还安装了所需的钱包适配器包和组件,并在 layout.tsx 中使用适配器组件包装了网页的主体。然后,无论是在 page.tsx 中还是在新组件中,都可以包含用于呈现 Blink UI 的逻辑。
For rendering a single blink, the logic would looks like this:对于渲染单次闪烁,逻辑如下所示:
import '@dialectlabs/blinks/index.css';
import { useState, useEffect } from 'react';
import { Action, Blink, ActionsRegistry } from "@dialectlabs/blinks";
import { useAction } from '@dialectlabs/blinks/react';

// needs to be wrapped with <WalletProvider /> and <WalletModalProvider />
const App = () => {
  const [action, setAction] = useState<Action | null>(null);
  const actionApiUrl = '...';
  // useAction initiates registry, adapter and fetches the action.
  const { action } = useAction(actionApiUrl, { rpcUrlOrConnection: <YOUR_CONNECTION_OR_RPC> });
  return action ? <Blink action={action} websiteText={new URL(actionApiUrl).hostname} /> : null;
}
或者,如果要渲染多次闪烁,则逻辑如下所示:
import '@dialectlabs/blinks/index.css';
import { useState, useEffect } from 'react';
import { Action, Blink, ActionsRegistry, type ActionAdapter } from "@dialectlabs/blinks";
import { useAction, useActionsRegistryInterval } from '@dialectlabs/blinks/react';
// needs to be wrapped with <WalletProvider /> and <WalletModalProvider />
const App = () => {
// SHOULD be the only instance running (since it's launching an interval)
const { isRegistryLoaded } = useActionsRegistryInterval();
const { adapter } = useActionAdapter(<YOUR_RPC_URL_OR_CONNECTION>);
return isRegistryLoaded ? <ManyActions adapter={adapter} /> : null;
}
const ManyActions = ({ adapter }: { adapter: ActionAdapter }) => {
const apiUrls = useMemo(() => (['...', '...', '...']), []); // Your Action APIs go here
const [actions, setActions] = useState<Action[]>([]);
useEffect(() => {
const fetchActions = async () => {
const promises = apiUrls.map(url => Action.fetch(url).catch(() => null));
const actions = await Promise.all(promises);
setActions(actions.filter(Boolean) as Action[]);
}
fetchActions();
}, [apiUrls]);
// we need to update the adapter every time, since it's dependent on wallet and walletModal states
useEffect(() => {
actions.forEach((action) => action.setAdapter(adapter));
}, [actions, adapter]);
return actions.map(action => (
<div key={action.url} className="flex gap-2">
<Blink action={action} websiteText={new URL(action.url).hostname} />
</div>
);
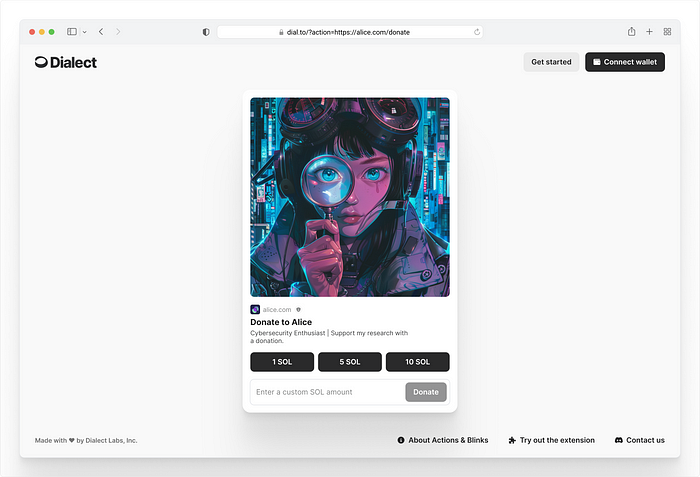
}然后眨眼会在您的网页上呈现类似于此。例如,这就是在 Dialect 的插页式“弹出式”站点 dial.to 上呈现眨眼的方式。
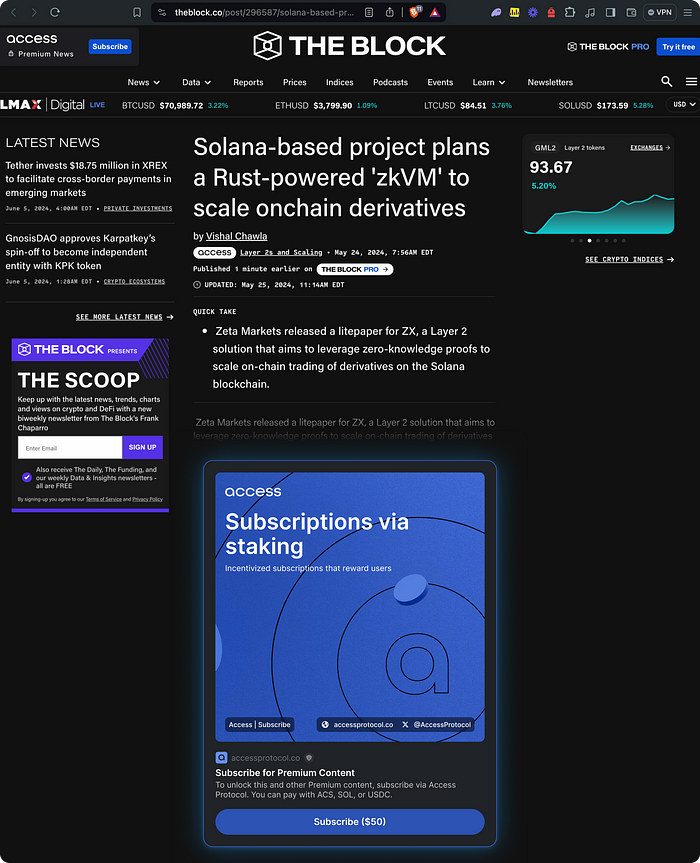
眨眼可以带到任何类型的应用程序,包括新的 web3 社交 dApp,甚至是想要开始添加 web3 功能的传统网站,例如 The Block,它正在使用 Access Protocol 订阅来访问优质内容。
新的 Blinks SDK 支持完全自定义眨眼样式,因此您可以完全按照您的产品品牌获得眨眼。
要自定义眨眼的样式,请向 <Blink /> 组件添加 stylePreset 属性,如下所示:
import { Blink } from '@dialectlabs/blinks';
...
return <Blink stylePreset="x-dark" ... />;
// The available presets are mapped to CSS classes like
// x-dark -> .x-dark
// x-light -> .x-light
// default -> .dial-light
// custom -> .custom
// Note that .custom does not contain any colors, radii or shadow您还可以通过更改用于特定预设的 CSS 变量来自定义每个预设,如此处所示
.blink.x-dark {
    --blink-bg-primary: #202327;
    --blink-button: #1d9bf0;
    --blink-button-disabled: #2f3336;
    --blink-button-hover: #3087da;
    --blink-button-success: #00ae661a;
    --blink-icon-error: #ff6565;
    --blink-icon-error-hover: #ff7a7a;
    --blink-icon-primary: #6e767d;
    --blink-icon-primary-hover: #949ca4;
    --blink-icon-warning: #ffb545;
    --blink-icon-warning-hover: #ffc875;
    --blink-input-bg: #202327;
    --blink-input-stroke: #3d4144;
    --blink-input-stroke-disabled: #2f3336;
    --blink-input-stroke-error: #ff6565;
    --blink-input-stroke-hover: #6e767d;
    --blink-input-stroke-selected: #1d9bf0;
    --blink-stroke-error: #ff6565;
    --blink-stroke-primary: #1d9bf0;
    --blink-stroke-secondary: #3d4144;
    --blink-stroke-warning: #ffb545;
    --blink-text-brand: #35aeff;
    --blink-text-button: #ffffff;
    --blink-text-button-disabled: #768088;
    --blink-text-button-success: #12dc88;
    --blink-text-error: #ff6565;
    --blink-text-error-hover: #ff7a7a;
    --blink-text-input: #ffffff;
    --blink-text-input-disabled: #566470;
    --blink-text-input-placeholder: #6e767d;
    --blink-text-link: #6e767d;
    --blink-text-link-hover: #949ca4;
    --blink-text-primary: #ffffff;
    --blink-text-secondary: #949ca4;
    --blink-text-success: #12dc88;
    --blink-text-warning: #ffb545;
    --blink-text-warning-hover: #ffc875;
    --blink-transparent-error: #aa00001a;
    --blink-transparent-grey: #6e767d1a;
    --blink-transparent-warning: #a966001a;

    --blink-border-radius-rounded-lg: 0.25rem;
    --blink-border-radius-rounded-xl: 0.5rem;
    --blink-border-radius-rounded-2xl: 1.125rem;
    --blink-border-radius-rounded-button: 624.9375rem;
    --blink-border-radius-rounded-input: 624.9375rem;

    /* box-shadow */
    --blink-shadow-container: 0px 2px 8px 0px rgba(59, 176, 255, 0.22), 0px 1px 48px 0px rgba(29, 155, 240, 0.24);
}
指南:通过Chrome扩展程序向第三方网站添加眨眼
如果您是 Chrome 扩展程序开发人员,想要向 X 等第三方网站添加眨眼功能,我们的 Blinks SDK 可以在几分钟内让您启动并运行。
对于 X 上的支持,请将以下逻辑添加到扩展脚本中:
// contentScript.ts
import { setupTwitterObserver } from "@dialectlabs/blinks/ext/twitter";
import { ActionConfig, ActionContext } from "@dialectlabs/blinks";
// your RPC_URL is used to create a connection to confirm the transaction after action execution
setupTwitterObserver(new ActionConfig(RPC_URL, {
signTransaction: async (tx: string, context: ActionContext) => { ... },
connect: async (context: ActionContext) => { ... }
}))
// or
import { type ActionAdapter } from "@dialectlabs/blinks";
class MyActionAdapter implements ActionAdapter {
async signTransaction(tx: string, context: ActionContext) { ... }
async connect(context: ActionContext) { ... }
async confirmTransaction(sig: string, context: ActionContext) { ... }
}
setupTwitterObserver(new MyActionAdapter());
眨眼支持应该是选择加入的(和可发现的)
如果您通过 Chrome 扩展程序在第三方网站上呈现闪烁,则默认情况下应选择启用闪烁。我们建议您从扩展程序设置中添加控件,以便用户能够启用或禁用闪烁。
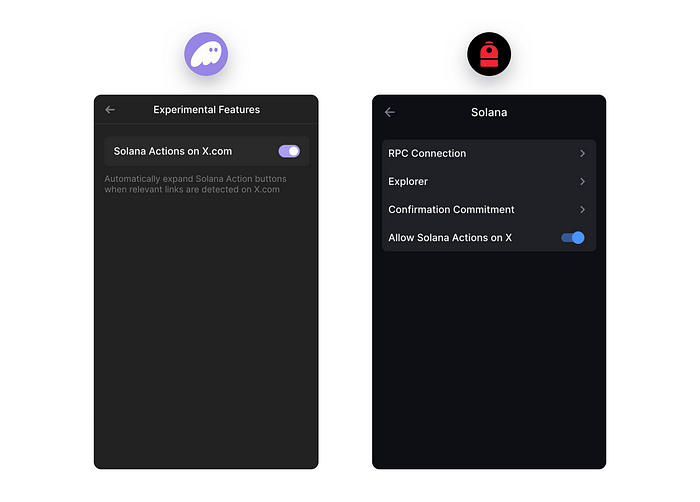
也就是说,这个新功能应该是可以发现的。请考虑在扩展中添加宣传材料,突出这种新行为。
X
上面的 Chrome 扩展程序示例为 X 添加了眨眼功能。 但是,结合我们新的眨眼组件和样式 API,我们现在拥有将眨眼功能带到更多第三方网站所需的工具。
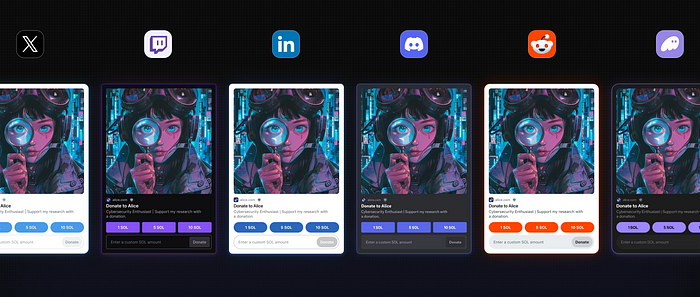
接下来是:Reddit、Twitch、Facebook等。
本文由SlerfTools翻译,转载请注明出处。
SlerfTools是专为Solana设计的工具箱,致力于简化区块链操作,提供无编程全可视化界面,使发币、管理流动性和无代码创建Dapp等复杂过程变得安全简单。